Hi, this blog post will be my first publicly released blog post ever. Here, I want to share some cool things that I learned recently in AI hacking field.
Introduction
Just a little bit background, I just explored the AI Security field starting from last year, so this will be more about sharing things that I think is pretty cool and please put that critical thinking hat on.
Now before we go into some skibidi terms, head-numbing math formulas, and paper recommendation that seems to waste our time, lets start with the basic concept to align our understanding on AI.
Figure 1: Evasion Attack on Image Classifier
Theoretical Foundation
So what is AI? Ok I think we all know this already, but what do I mean by AI classifier here? Are we targeting ChatGPT? What do we need to evade?
AI itself is a broad field that covers technique for computers to perform tasks that typically require human intelligence. 'Traditional' AI or older AI focused on prediction and pattern recognition. On the other hand GenAI (Generative AI) or newer AI focus on content creation, these contents include things like text, code, image, even voice trained on super large dataset. So basically, the things what most people used now is part of GenAI (ChatGPT, Dall-E, etc), the subset of AI as a field itself. Now what is AI model? Lets think of it as final product, the final product of code (algorithms and parameters), trained using a lot of data, and able to do something really cool like predicting when the rain will fall (??? not sure about this XD), classifying object, or even automate task.
In short we will be targeting AI classifier, in this case a model that takes image as an input and output a 'label' that tells what the object is. The evasion attack itself is a type of adversarial attack where the attacker manipulates input data to bypass the model's detection or cause it to make a wrong prediction. Now one important aspect about this is the concept of decision boundary. Basically, decision boundary is the invisible line (or surface) that a classifier draws to separate different classes/output. Hopefully you get the intuition when looking at the image below.
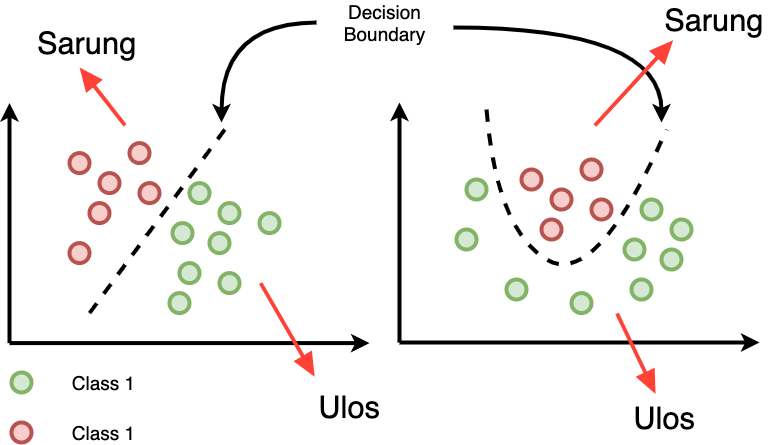
Figure 2: Illustration of Decision Boundary
Types of Evasion Attacks
- White-box attacks: The attacker has complete knowledge and access of the model architecture, parameters, and training data.
- Black-box attacks: The attacker has limited knowledge and no direct access to the model (weight), typically only able to query the model and observe outputs.
- Targeted attacks: The goal is to cause misclassification to a specific target class.
- Untargeted attacks: The goal is to cause any misclassification away from the correct class.
C2W Concept
The Carlini and Wagner (C&W) attack, often abbreviated as C2W, is one of the most powerful optimization-based evasion attacks. It formulates the adversarial example generation as an optimization problem that balances two objectives: minimizing the distance between the original and adversarial examples while ensuring misclassification.
The C&W attack is particularly effective because it directly optimizes for adversarial examples that are minimally different from the original inputs while achieving the desired misclassification. Do you understand all that? If not I present you the paper: https://arxiv.org/pdf/1608.04644
Mathematical Foundation
Hey, I'm not even that strong in math. But here is the math formulation taken directly from the paper (Page 7).
Objective Function
The C&W attack formulates the problem as:
Where:
x = Original Input (Our Image)
δ = The pertubation / change we're adding to our input
‖δ‖ₚ = The size of change
f(x + δ) = Custom loss function. Basically mathematical function that measures how wrong a model's predictions is.
c = Constant, controls how much we "care" for each part
x + δ ∈[0,1]n = This is the constraint so that our pixel is stay between 0 and 1
So what does it mean? No idea. But its probably something about how we change the input just enough so the model misclassifies it while keeping the constraint of pixel values and just not too much change for our human eye to detect.
Setting Up the Environment
Before implementing the attack, let's set up our environment with the necessary tools and libraries. In this case, I use python notebook .ipynb so that I can trace my code step-by-step.
Import Libraries and set GPU
            import torch
            from torchvision import transforms
            import numpy as np
            from PIL import Image
            from IPython import display
            import pandas as pd
            from matplotlib import pyplot as plt
            from transformers import AutoTokenizer, BertForSequenceClassification
            from art.attacks.evasion import CarliniL2Method, HopSkipJump
            from art.estimators.classification import PyTorchClassifier, BlackBoxClassifier
            # We can try various attacks later, now just import everything XD

            # put the model on a GPU if available, otherwise CPU
            if torch.mps.is_available():
                device = torch.device('mps')
            else:
                device = 'cpu'
            print(device)
Figure 3: Importing the Libraries
Loading Pre-trained model
Instead of building our own model and training data from scratch lets use publicly available pre-trained model. A pre-trained model is a machine learning model that has already been trained on a large dataset for a general task, so we don't have to start training it from scratch. In this case I will use model called 'resnet50', a pretty good model used by a lot of people for image-related task.
            from torchvision.models import resnet50, ResNet50_Weights
            weights = ResNet50_Weights.DEFAULT
            model = resnet50(weights=weights)
            preprocess = weights.transforms()
            categories = weights.meta["categories"]

            model.to(device) # Move model to whereever the device parameter we defined earlier falls into
            model.eval() # Set the model to evaluation mode
Loading our Image
Let's use an image of batik for our case study.
            #Load Image
            image = Image.open('/Users/NoOne/.cache/kagglehub/datasets/dionisiusdh/indonesian-batik-motifs/versions/1/batik-celup/1.jpg')
            image_tensors = preprocess(image).unsqueeze(0).to(device)
Evaluate Original Image
Lets throw our image to the model to see what will it categorized to.
            #Evaluate Image
            with torch.no_grad():
                out = model(image_tensors)

            pred = out.argmax(dim=1).item()

            #Show Image and its prediction
            plt.imshow(image)
            plt.title(categories[pred])
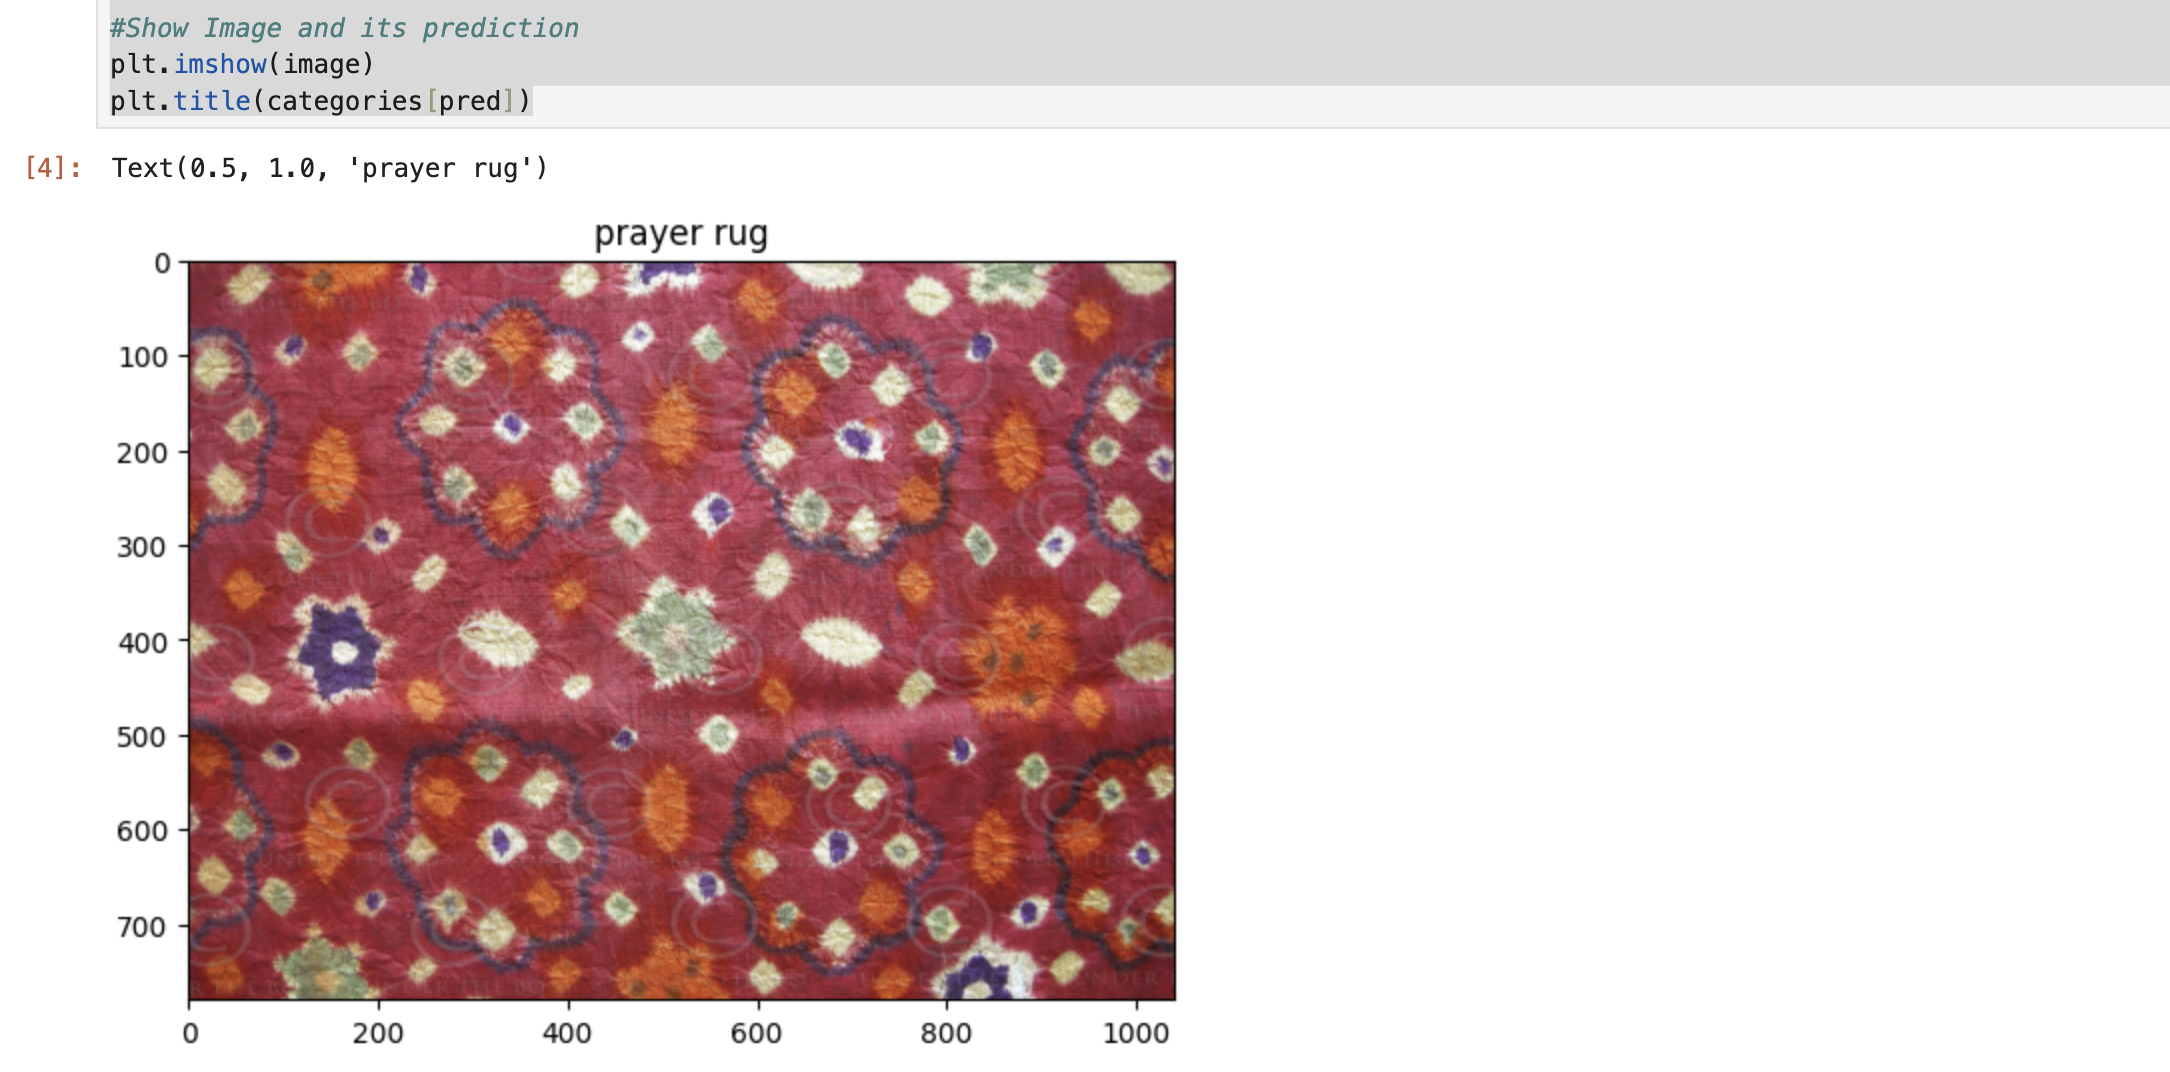
Figure 4: Evaluating Original Image
Implementation
Now let's implement the C&W attack using the Adversarial Robustness Toolbox (ART). Alright, I need to explain first what is this ART that we will be using. Below is a brief explanation of ART according to the tool official website:
Adversarial Robustness Toolbox (ART) is a Python library for Machine Learning Security. ART provides tools that enable developers and researchers to evaluate, defend, certify and verify Machine Learning models and applications against the adversarial threats of Evasion, Poisoning, Extraction, and Inference.
Don't get me wrong, we can implement this manually. But for now lets use one of the most useful tools in the AI security field for our exposure to the industry standard. Let's get into it.Creating ART Classifier Wrapper
First of all we need to create the classifier wrapper. This time I will use PyTorchClassifier and specify the parameters that we need.
            classifier = PyTorchClassifier(
            model = model,
            loss = torch.nn.CrossEntropyLoss(),
            nb_classes = len(categories), # 1000
            input_shape = (3, 224, 224),
            clip_values=(0.0,1.0)
)
Implementing the C&W Attack
Now lets start the attack and get the result. After getting the result throw it back to the model to see where it ends up.
	    attack = CarliniL2Method(classifier)  # Instantiate the attack
	    adversarial = attack.generate(image_tensors.cpu().numpy()) #Start the attack

            adversarial_tensors = torch.tensor(adversarial).to(device)
            model.to(device)
            with torch.no_grad():
                adversarial_output = model(adversarial_tensors)

            #Convert back tensor to image and print prediction
            adversarial_image = transforms.functional.to_pil_image(adversarial_tensors.squeeze(0))
            adversarial_pred = adversarial_output.argmax(dim=1).item()
Visualizing the Results
Now lets visualize the result and see the difference in image. Can you spot the difference?
            # Create subplots
            fig, axs = plt.subplots(1, 2, figsize=(10, 5))

            # Original image
            axs[0].imshow(image)
            axs[0].set_title(f"Original: {categories[pred]}")
            axs[0].axis("off")

            # Adversarial image
            axs[1].imshow(adversarial_image)
            axs[1].set_title(f"Adversarial: {categories[adversarial_pred]}")
            axs[1].axis("off")

            # Show the plot
            plt.tight_layout()
            plt.show()
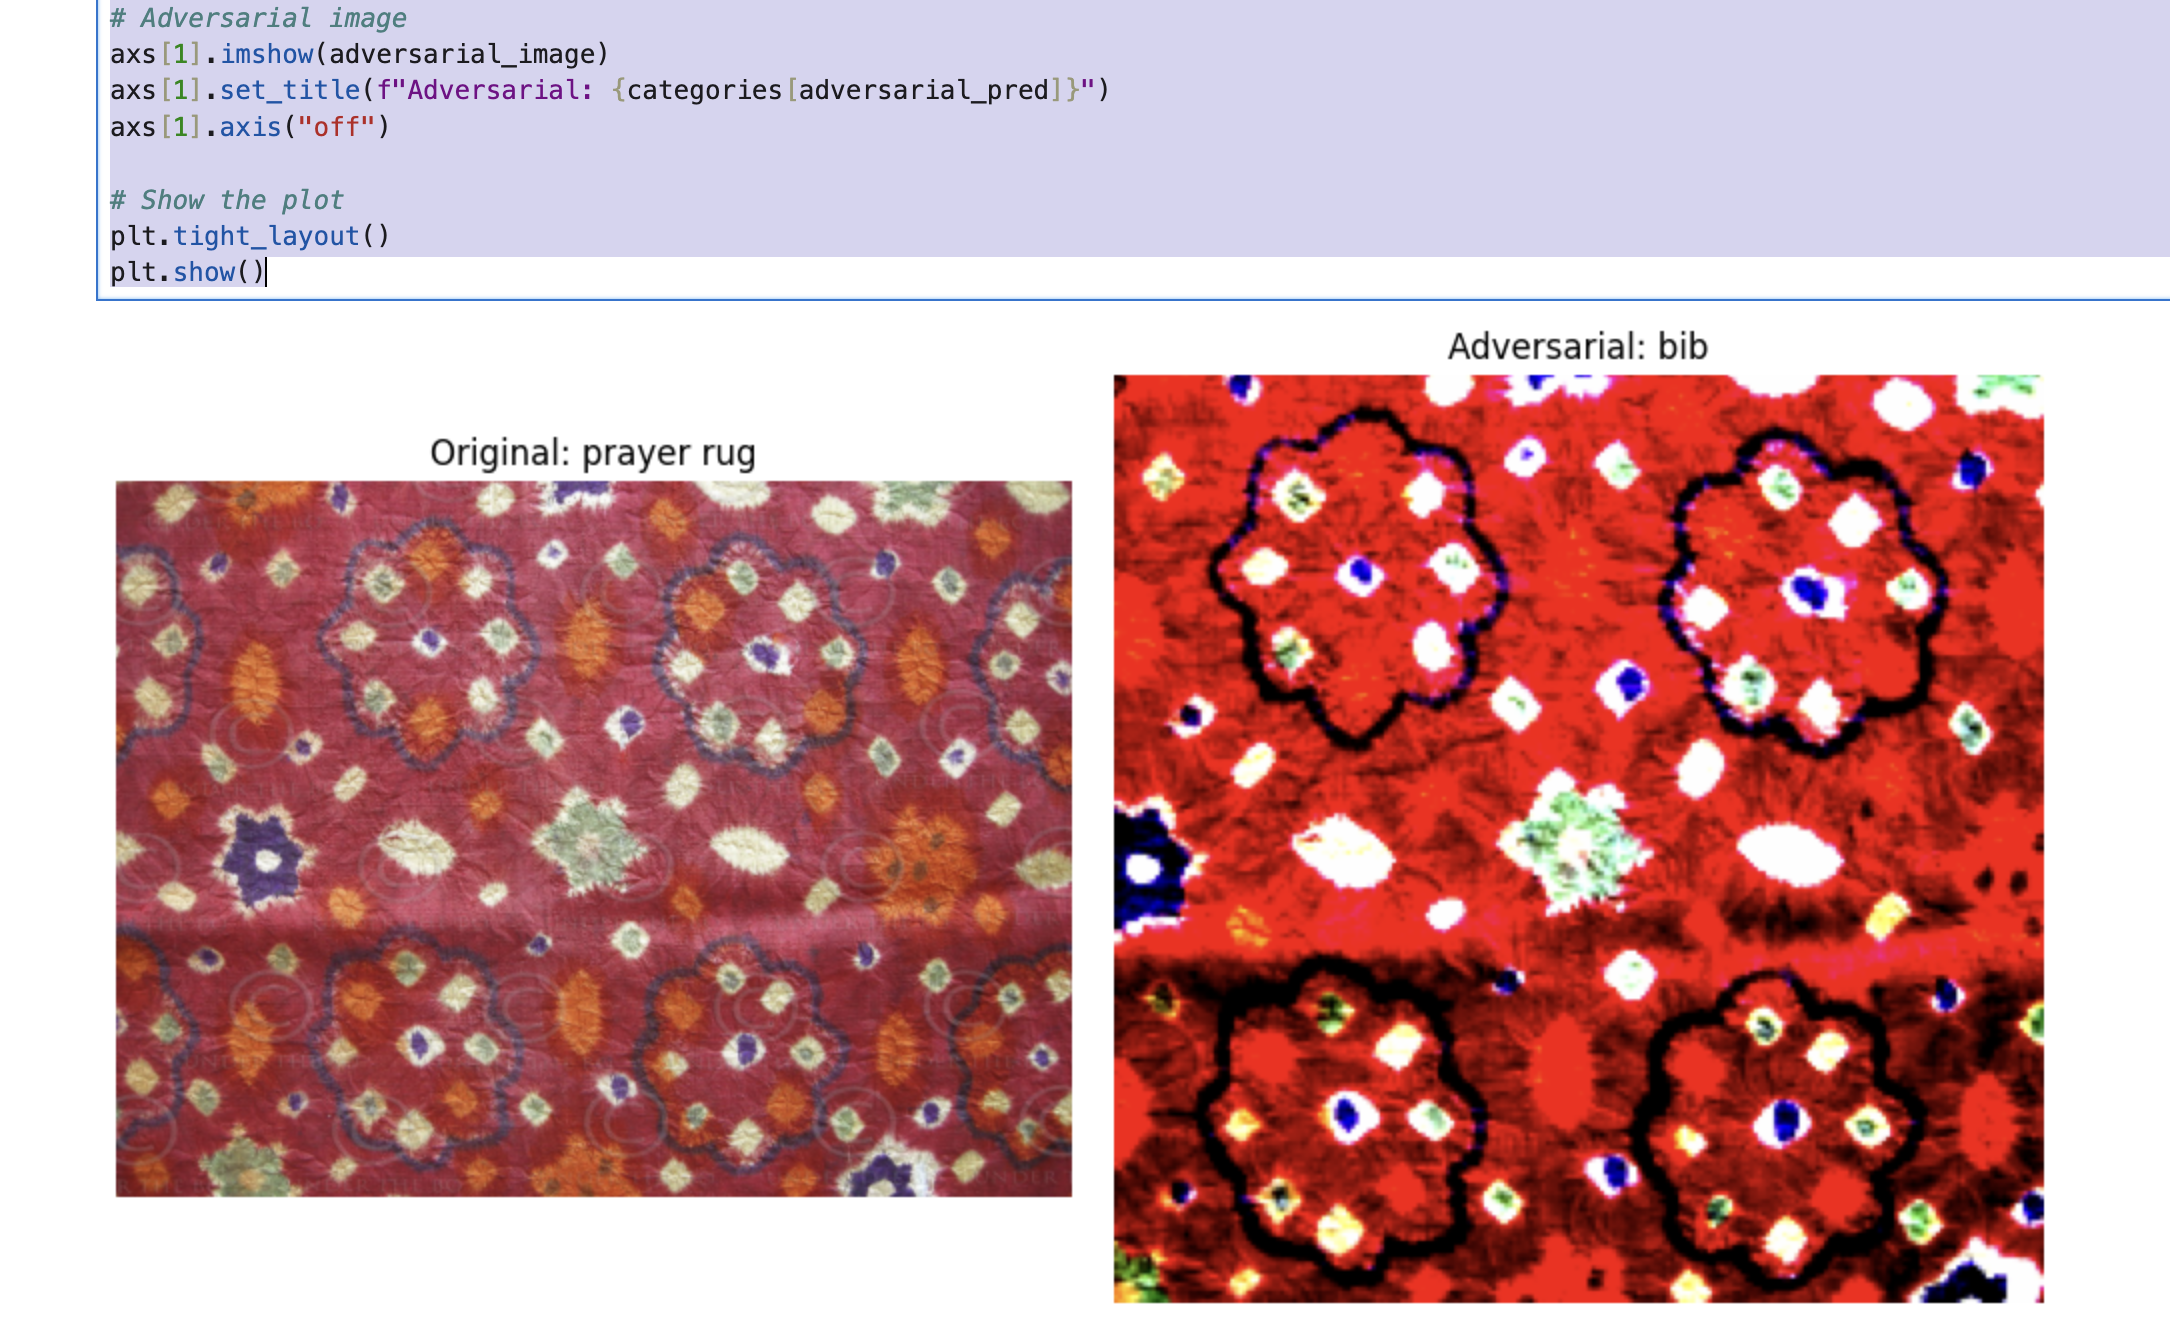
Figure 5: Comparison of original image and modified image along with its prediction.
Experimental Results
How is it? Is that close enough or you can spot the difference clearly? You will notice that there is difference in size and the color / brightness in our adversarial image that will be noticed by human eye. However, this kind of thing usually handled by post-processing step that we can do to make the demonstration of the modified image looks closer to the original one. Also, we can play with the parameter in ART specified above like clip_values or adding some new parameter like learning_rate to make the adversarial image looks more similar to the original image.
Conclusion
Evasion attacks is something that we need to keep in mind as we're moving forward with more advanced AI system like computer vision. The Carlini & Wagner method above, demonstrates that even well-trained and popular model remain vulnerable to carefully crafted adversarial examples. Also please note that we are using whitebox approach with untargeted method. Meaning that we have direct access to the model and not targeting a specific label, we just want to pursue the not(x) output if x is the original image.
Understanding this kind of attack is the first step toward building better AI systems. Defense mechanisms such as adversarial training, feature squeezing, and input transformation can help mitigate these risks, though no perfect defense exists yet.
Discussion and feedback will be always appreciated. See you and stay safe! 😎